Why and How: Creating Isolation Photos
In a previous article, I shared with you some techniques to inspire and improve your narrative photos.
In the following article, I will share some tips on how to build your isolation photos.
Keep in mind that the narrative practice and the isolation practice are two techniques at your disposal to build and create your photos.
This article will help you understand how to implement a new tool in your photography toolbox. By implementing it, you will make your photos even more interesting and instill in them true meaning.

The Definition of an Isolation Photo
A photo is said to be isolated when the main photographic element (the subject) is isolated from the background.
The sharpness is limited to this one element. All other parts of the picture are blurred.
An isolation photo is constructed either in the shooting phase using the choice of the aperture, or in the development phase using an editing software on a computer.
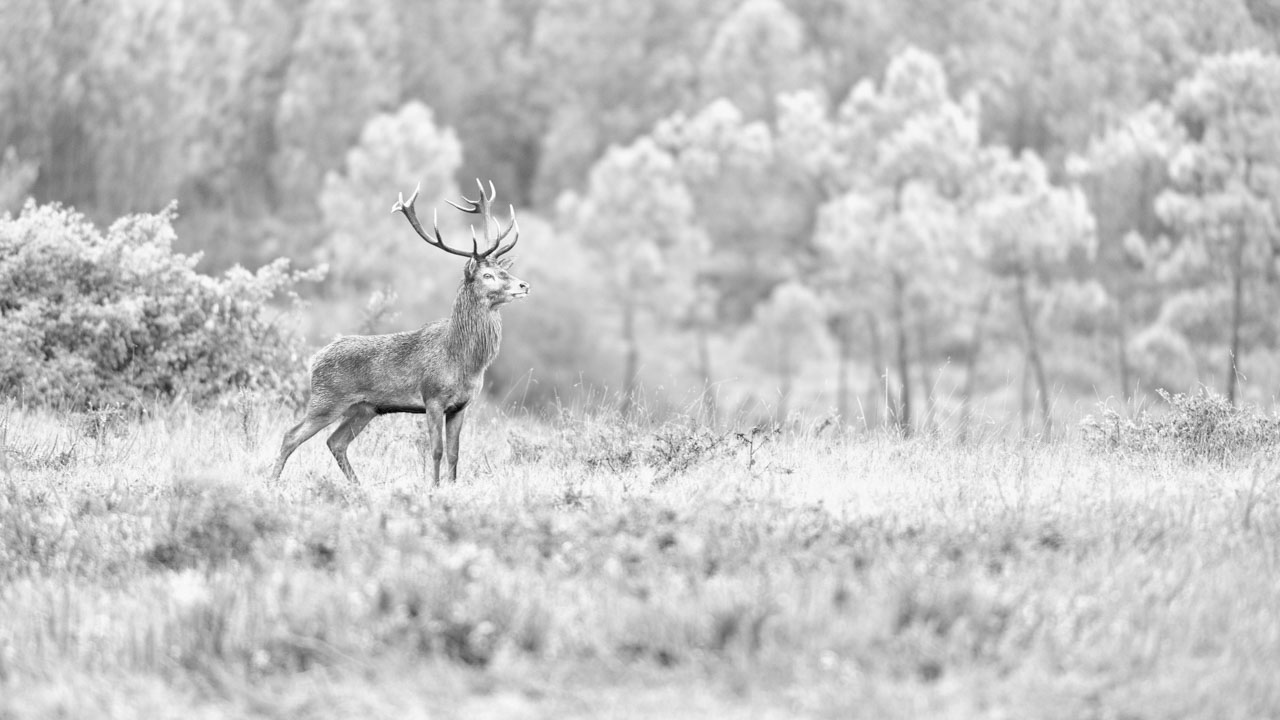
Some Examples of Isolation Photos
I share with some isoation photos.


Why You Should Create Isolation Photos
The purpose of creating an isolation photo is to form a singular photographic composition.
It is a creative technique that allows you to refine a photographic style.
If you decide to make isolation photos solely for the purpose of having an isolated photo, you will waste your time. Your photos will not be interesting. This technique must be used to transmit your emotions, your messages, or your personal aesthetic. It will help you to reinforce your photographic approach with a style that is your own.
The goal of an isolation photo is to have the subject in focus and to blur the unimportant or irrelevant photographic elements existing as noisy background space.
If you want to show only the subject, it is because it has something special. Its intrinsic qualities will carry the photo, attract the eye, and impart meaning to the photo.
When you create an isolation photo, it is because the photographic elements other than the main subject are not of great interest. You are profiling them rather than showing them. They function as disruptive elements that you cannot remove in your framing and composition.
Materials You Will Need
The choice of equipment is important when striving to create isolation photos during the shooting phase.
You can also achieve isolation photos in post-development with editing software and a computer, but you will need additional skills. To achieve a realistic result, you may need even more time. Creating an isolated photo during the shooting phase is still the best way for you to approach this technique, as it is the fastest and easiest way to gain realistic results.
First, you need to choose a sensor that is large enough. For example, the sensors of mobile cameras or bridges are too small to create nice, blurred shots.
The larger the sensor, the easier it will be to take an isolation picture, because you will have a smaller depth of field using the same focal length.
However, the longer the focal length, the better the result will be.
Taking an isolation picture with a camera equipped with a 24×36 mm sensor and a 600mm lens will certainly be easier than a camera with an APS-C body equipped with a 300mm.
But in general, I recommend the telephoto lens. It has a narrow angle of view and a limited depth of field.
Shooting at the maximum aperture, whether f/2.8, f/4, or f/5.6, will greatly reduce the depth of field on both sides of your focus area.
It is possible to take isolation pictures with a wide-angle lens. But you must place your photographic elements in a particular way. Do not include a foreground. The background should be as far behind your subject as possible. The result is less spectacular than with a telephoto lens, but you will be able to obtain striking compositions.
Also, do not forget that you can edit your photos with a computer to enhance the effects.
If you want to take high-impact isolation photos, choose a large sensor and a long focal length.
Few photographers know this, but there is an interesting feature on cameras. It is the depth of the field test button. It is often located on the front of the camera, to the right of where the lens attaches.
Its function is simple: to show you the size of the depth of field; in other words, the area of sharpness around your focus area. If you are at full aperture of your lens, like f/2.8, f/4, or f/5.6 and you press the button, you will not see anything special in your viewfinder eye. However, the more you close your aperture, the specific depth area will darken as you continue to press the depth of field test button.
Why? Because you see in real time the light received by your camera. If you are opened to f/13 for example, you can see the light entering through this opening.
You should be well-acquainted to this darkness in your eyepiece to analyze what is sharp and what is not. This is how you will determine the size of the focus area. It is not easy at first. But believe me, with a little practice, analyzing the depth of field becomes easy.
I use this function all the time in the field. For me, it is vital.
Incorporating Bokeh
You probably know this. The bokeh technique allows you to take pictures with only the subject in focus. This technique is mostly used in macro or telephoto photography.
This is one way to make isolation photos. But it is not the only way. It does not apply to wide-angle lenses, and it does not work in the post-development.
Identifying the Visual Majority
Creating an isolation photo means focusing on the main subject while blurring the other photographic elements.
Before discussing this further in this article, I think it is important to define a particularly crucial element that concerns all of us as human beings. It is the visual majority.
It is important to understand this concept because it exists beyond photographic technique and influences our daily life.
Visual salience is a concept of human physiology; it defines that which stands out as important in any scene in our daily life. For a human being looking at a scene, let alone a photo, his vision system assigns clarity and sharpness to that which is important. For example, a couple may look at their kitchen and each see different perspectives, one may immediately notice the pile of dirty dishes in the sink that need to be washed, and the other may be drawn to the sight of a cake that is half-decorated. Each is looking at the same scene, but each one has assigned a certain part of that scene as their visual majority, and that is what they notice first.
This behavior can be explained by the fact that our distant ancestors constantly had to identify potential dangers, such as ferocious and hungry beasts, to survive living in the wild. To navigate tasks and dangers, they would examine what was in focus in the scene in front of them to distinguish where the danger might come from. Today, we have retained this ability to pay attention to that which is sharp and clearly defined in our vision, just not for the same reasons.
So, if you want to build and create interesting and impactful plates, you should better define your area of focus and construct it as the visual majority in your photo. That way, you can be sure that your audience's eyes will be focused on the subject you have chosen.
The Shooting Phase
To take an isolation photo in the field, you need to choose a particular scene.
The subject, i.e., the place where you are going to focus, must be alone in the plane of sharpness.
For example, if you choose to photograph an animal, avoid having a tree, rock, or other elements in the same picture.
Next, focus on the subject by selecting the correct focus point on your camera. Try to have the background as far away from your subject as possible. Since you will be shooting at full aperture, your area of focus will be reduced. Since your background will be far away, it will become blurred. If you shoot with a wide-angle lens, you will not have a totally blurred background. Details will remain. Do not forget that wide-angle lenses, also called short focal lengths, have very wide areas of sharpness, unlike telephoto lenses.
To obtain a good isolation photo, avoid integrating a foreground. If you cannot do otherwise, choose the lightest possible background.
Simply put, an isolation photo is often composed of a subject and a background.
Personally, I use this technique a lot in my wildlife photos when I compose environmental wildlife photos. My animal is quite small in the picture. It is integrated in its environment. I then use the high-hey or low-key technique to highlight my subject.
When I compose and frame an isolation wide-angle shot, I often use the close-up wide-angle technique. This is my favorite technique for underwater atmospheric photography. I integrate my main subject in the foreground. I focus as close as possible. Sometimes I even get to the minimum focusing distance so that the background is as blurred as possible. Then I release the shutter.
When I use a wide-angle lens to take isolation pictures, I do not hesitate to shoot low angle to add an oversized version of my subject in relation to the scene.
Remember that the purpose of an isolation photo is to create an impact in your photo using a strong subject.
Finally
I hope that this article has given you the keys to creating isolation photos. The main point of this technique is to highlight the subject by isolating it from the rest of the scene.
You need to take particular care with the focus and aperture.
Isolation photography is a powerful technique for creating impactful photos.
Be humble, patient, constant, persevering, and persistent because the road to excellence is long.


")
")