• The Art of ChoosingHome page
  • Fine Art Prints3 Editions
  • CollectionsAll Collections
  • AboutAmar Guillen
  • Customer Space & Contact
  • Select your language

    • English (United Kingdom)
    • Français (France)
  • All You Need to Select Your Fine Art Print
    • How to Choose a Fine Art Print - Q&A - FAQ
    • New Creations
    • Explore Some Interiors
    • Fine Art Print Blog
  • Browse by Edition
    • All Fine Art Prints
    • Unique Edition
    • Limited Edition
    • Open Edition
  • Browse by Style
    • Black and White
    • Color
    • Fusion
    • Impression
    • Back to Black
    • Landscapes in Black and White
    • Landscapes in Color
    • Animals in Black and White
    • Animals in Color
  • Browse by Theme
    • Landscape
    • Wildlife
    • Underwater
    • Abstract
    • Symbolic
    • Landscapes of the United States
    • Landscapes of France
    • Landscapes of Scotland
    • Seascapes
    • Relaxing
    • Energizing
    • Playful
  • Browse by Format
    • Rectangular
    • Square
    • Panoramic
  • Contact Me
    • Contact Me by Email or Phone
  • Collections
    • New Collections
    • All Collections
  • Browse by Theme
    • Landscapes
    • Wildlife
    • Underwater
    • Abstract
    • Symbolic
    • Landscapes of France
    • Landscapes of the United States
  • Browse by Style
    • Black and White
    • Color
    • Impression
    • Back to Black
    • Fusion
  • Contact Me
    • Contact Me by Email or Phone
  • Discover More About Me
    • Discover Who is Amar Guillen
    • Artistic and Photographic Statement
  • Galleries
    • Photo Galleries
    • Abstract Portfolio in Color
    • Black and White Landscape Photography Portfolio
    • Color Landscape Photography Portfolio
    • Black and White Wildlife Photography Portfolio
    • Color Wildlife Photography Portfolio
    • Underwater Photography Portfolio
  • Contact Me
    • Contact Me by Email or Phone
  • Your Customer Space
    • Create or Manage your Account
    • Your Download Space
    • Your Orders
  • Contact Me
    • Contact Me by Email or Phone

You are in that section: Home > Blog > Blog of the Photographic Creation Approach

Low Key Landscape Photography

A low-key landscape photograph of the Grand Canyon in black and white.

Why and How to Photograph Landscapes in Low Key

If you like to create landscape photographs, you may certainly be looking for a new style or a new way to capture your pictures.

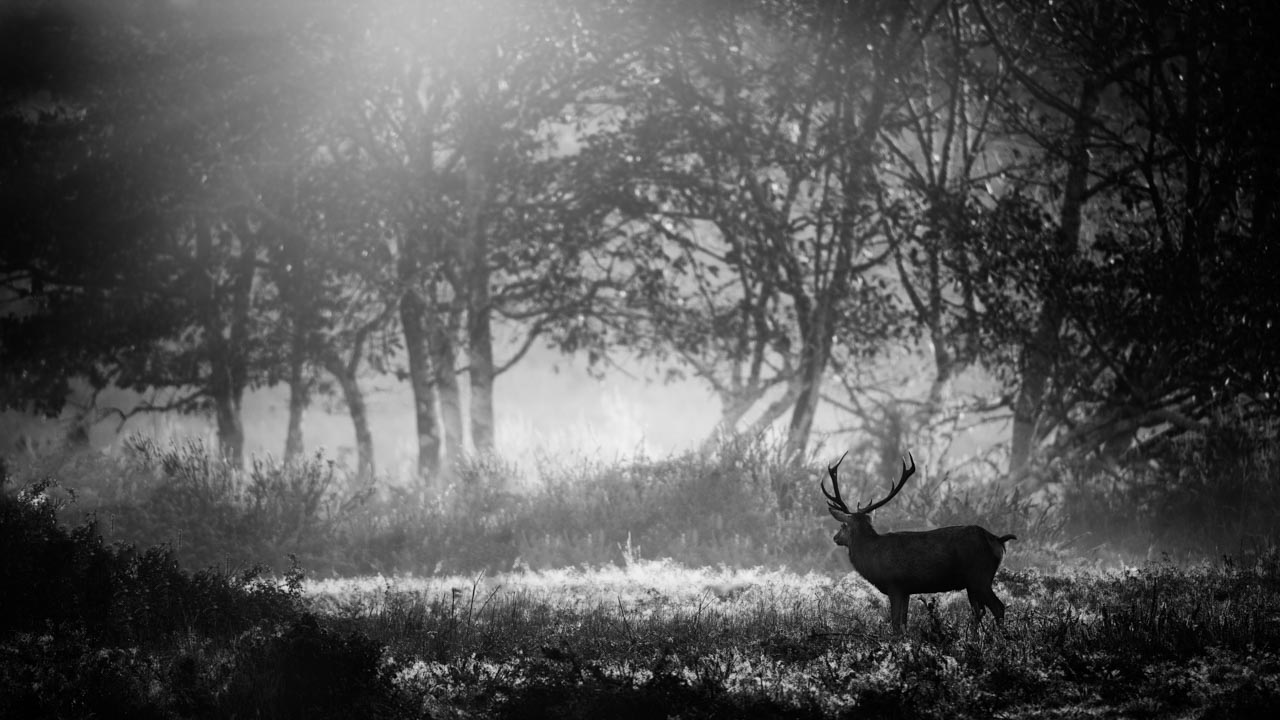
Landscape photography is a photographic theme perfectly suited to low key, as your goal in low key is to make pictures with mysterious and dramatic atmospheres.

I am passionate about the low key style. I use it quite often in my landscapes of the southwestern United States.

In this article, I will share with you some of the techniques I use.

9 Steps for You to Last in Photography.

Preamble

This article devoted to landscape photography in low key is the continuation of a dossier devoted to low key photography from a general perspective. As I am specialized in nature photography, my three favorite themes are landscape photography, wildlife photography, and underwater photography.

This article addresses one of these three photographic themes. I advise you to read or reread the general article on low key before beginning this particular article. I have already developed many points in the previous article which I may mention here but which I will not attempt to revisit.

The Little History of This Article

Landscape photography was not for me the first photographic theme I chose for low key photography. I began with wildlife photography.

For an exceedingly long time, I used color for all of my landscape photos. I used the HSL technique frequently to modify and embellish my color photos.

A few years ago, I decided to start a large photo project dedicated to the landscapes of the southwestern United States. I started buying many books from American photographers who had chosen this theme for their photographic creations.

I was very inspired by Ansel Adams' books, not only by the quality of his black and white photos but also by the techniques he used to make them.

I began to study the 10-zone system he had developed. I very quickly realized that this system was applicable almost exclusively in black and white.

The photo that really triggered my passion for low key landscape photography is the Snake River in Grand Teton National Park in Wyoming. It was a real revelation. It was like an electric shock when I first gazed upon it. I was touched emotionally in a way that I had never experienced before when looking at a landscape photo. It was from that day on that I decided to create low key landscape photos.

Why: Photographing Landscapes in Low Key

The first reason that comes to mind is the ease of finding scenes. You certainly have landscapes around your home to photograph. All you have to do is move a few kilometers to find them. As I will explain in one of the following paragraphs, the crucial choice is that of the scene.

The second reason is that you will master a new photographic style. It will be an additional tool to help you express your moods and emotions which will help you to create interesting photos.

The third reason is that you are stepping out of your comfort zone. Why do you always do the same thing and follow your habits? Low key landscape photography is a way for you to get out of your comfort zone, test your limits, and build new creative boundaries for your photos.

Why and How: Using the Photographic Language of Black and White.

Good Landscape Scenes for the Low Key

For your low key landscape photographs, I advise you to choose scenes that include:

  • Dense backdrops like heavy foliage.
  • A single light source like stripes of light.
  • Clouds or a storm to reinforce the dramatic flair.
  • A body of water to reflect the light and subjects of your photos.

Your scenes must have textures, details. But above all, they must have a strong element such as a tree or a mountain. You have to fix the viewer's gaze to a main point. Do not forget that a low key photo is made up of an illuminated area in a darker setting. You should attract attention with the light.

Scenes to Avoid for Low Key

I think that landscape scenes with snow should generally be avoided when using low key. However, you may encounter a snowy situation which would be a good fit for low key, and I encourage you to use it then. It is just that these occurrences are very rare. Snowy scenes are often suitable for high key, and usually these clear, minimalist scenes are badly adapted for low key.

The softer the scenes are without textures or details, the more vaporous they are, and consequently, the less suitable they are for low key.

The Zone System For Measuring the Light

When you are going to make a low key landscape photo, you need to know how to evaluate the brightness in dark and light tones. The greater the difference between the two tones, the greater the contrast will be and the more visual impact your scene will have.

To carry out this evaluation, I advise you to use the zone system.

I want to remind you that the zone system was invented by the American photographer Ansel Adams. His goal was to obtain the maximum detail in each tone of the photo. The principle is simple. The chart includes 10 zones (10 tones) ranging from 1 to 10, each zone is noted in Roman numerals. Zone I (1) is the tone most images fall into. It is usually said to be the underexposed zone. Zone X (10) is the brightest tone. This is the overexposed area.

The system therefore consists of 10 zones. Between each of them, there is a difference of one light stop. So, you will have a dynamic of 10 stops between the lightest and the darkest zone.

I consider that the best way to get high quality low key landscape photos is to use Ansel Adams' 10 zones.

The principle of the zones is quite simple to understand. Ideally a scene that is photographed should have a dynamic of 10 zones. This way you would have details in both the dark and light areas. Everything would be perfect in the best of worlds. The problem comes from your camera. Even if the dynamic range of today’s sensors can reach 14 stops, you will still have trouble getting interesting details in the dark and light areas. This is due to the measurement of light. You will have to make choices for your exposure. Ultimately, your low key will not be perfect.

The only way you can get a picture that conforms to the 10 zones is to bracket your scene. That is to say that you will photograph a scene by changing exposure by one stop for each shot. To make this bracketing, I recommend that you use a tripod so that you don't move. The change of exposure will be done with the shutter speed. Here is the procedure to follow:

  • You take a first picture with a balanced exposure for the camera. For this you use your bar graph. The cursor of the bar graph must be on zero. This value means that the exposure is correct for the camera's light metering.
  • You then vary the speed by -1 stop. You take a picture. You repeat the process until you reach -5 stops.
  • You start this state again by varying the speed from plus +1 stop to plus +5 stops.

Thus, you will get a picture with the dynamic valley ranging from -5 stops to +5 stops.

The process of creating the low key photo will take place on the computer. You have two solutions at your disposal.

The first solution is to use a software called HDR (High Dynamic Range) to stitch your photos. The software will work automatically for you. The purpose of HDR software is to show details in all areas of your photo whether it is in dark or light tones.

The second solution is to use software capable of creating layers and blend masks. Using the brush, you will reveal details in light and dark areas. You will then start from the photo with the exposure at zero. Then you will stack the other photos to add the details.

Personally, I often use the fusion mask and brush technique because I can completely control the creative process. I can easily manage the details to so that they appear accompanying the density of the image. It is an easy technique to put into practice. As it is manual, it is a bit more time-consuming than using HDR software.

To summarize this paragraph, I advise that you choose your scene well in terms of light, shadows, textures, and details. Take several photos by bracketing your exposures. Assemble them with a software on your computer in order to have the best possible low key.

Using Clouds

Clouds can totally change the mood of a low key photo. Indeed, it has a wide range of contrast. However, be careful not to overexpose the highlights. In this case it could distract the eye for hours.

With experience, I have found that the details in the clouds were what the eyes of the hour appreciate the most.

6 Steps to Master the Creation of Good Photos.

Finally

I hope that this article about low key landscape photography has inspired you and opened new creative avenues.

The best advice I can give you to succeed in your landscapes with this style is to learn how to use the 10 zones system. This will allow you to have details in both dark and light tones. Development is an essential phase to master for this style of photography.

In the following article, I will share with you some techniques concerning the use of low key in animal photography.

Wildlife Photography in Low Key

Low Key Photography Allows You to Develop a Personal Photographic Language

A low-key photo in black and white of a red deer stag during the rut. Photograph by Amar Guillen, photographer artist.
A low-key photo in black and white of a red deer stag during the rut.

Tip #4: Measure Light in Spot Mode

On your camera, you usually have three different modes to measure light:

  • The matrix mode (sometimes called evaluative).
  • The central weighted mode.
  • The spot modet.

I advise you to utilize the spot mode. Many cameras allow you to use this mode either on the focus area or on an area in the center of the image. Consult the technical brochure of your camera to know the options. In any case, the spot measurement of the light is carried out on approximately 5% of the totality of the photo.

If you measure the light on the subject that is illuminated and the general tone of your scene is dark, you will receive a part of the image well exposed while everything else will be dark. This is exactly what you want. If you measure the light over the whole picture with the matrix mode, you will get an average. Your scene will not be contrasted properly.

Never forget that for a low key photo, you need to increase contrasts and dark shadows. They are your best allies.

How Managing the Criticism of Your Photos.

Tip #5: Avoid Using Too High of a Sensitivity

When you photograph a scene with dark tones and if your light conditions are weak, you will need to increase the sensitivity of your camera. You will create noise. Even if you can reduce it with a noise canceller during development, the idea is to limit it as much as possible when shooting to preserve details.

Indeed, the noise reduction of a photo causes the loss of detail.

That is why I advise you to use a tripod for your photos. Even if your shutter speeds are low, you will be well stabilized. You will not need to increase the sensitivity.

Tip #6: Contextualize Your Low Key Photos

Often, when you look at a low key photo, you see a brightly lit subject that stands out in contrast to a dark environment. This is the principle of chiaroscuro. Today, many photographers encourage the use of black too frequently. Its use becomes a normal absolute. There are no more nuances. If you look carefully at the paintings of the Renaissance, you will see that details still remain in the dark tones. Blacks are never absolute.

This is what I call “contextualization of scenes.” I believe that in photography, black areas should not be blocked. Details should be visible. For example, when I photograph a bird in low key on a pond, I make sure I have its reflection on the water. During development, even if I accentuate the darker tones a bit more, I will preserve details in the reflection to contextualize the scene.

Tip #7: Process Your Photos

To get a nice low key photo, I think computer processing is an essential step.

Do not forget that the development of a photo allows you to strengthen your photographic approach.

Many tools allow you to strengthen or enhance low key photos. Simply change the contrast by selecting dark tones, mid tones, or light tones.

Do not use the overall contrast setting because you will lose detail on the contours of your subject. Once it is printed, you will have a flat photo with a lack of detail.

Do not force the saturation of the black color either. A good photo is always judged by the details present in all these areas. I believe that a correct exposure is the hallmark of any good photographer.

In your developments, keep in mind that a low key photo must be mysterious. Ultimately, its atmosphere should be one of intrigue and questioning.

To fully discuss the development of low key, I would need to write an entire article devoted to just that. This article has a different focus, one which is solely related to the photographic approach. I will describe the development of low key technique in a future article.

6 Steps to Master the Creation of Good Photos.

Tip #8: The Black and White Low Key Photography

When developing a low key photo with your computer, I recommend using black and white.

This technique is best suited to create mysterious and dramatic atmospheres. As I described in another blog post, black and white photography is suitable for scenes with a lot of detail and texture. Just as your low key scenes in nature are shrouded in shadows and dark textures and details, the use of black and white further intensifies the images’ visual impact.

Moreover, since you are photographing with a single light source, your subject will be even better highlighted because the viewer will not be distracted by the different colors.

If you choose black and white for your low key photos, I advise you to only change the contrast during this step. The result will be much better if you do not change the contrast on the color photo before switching to black and white.

As far as low key in color is concerned, it is quite possible, as these examples are depicted below. Some colors like green are very admirably adapted. But the final result is less spectacular than what it is in black and white.

However, if you choose to utilize color for your low key photos, the trick is to decrease the vibrance to remove the distractors of overwhelmingly bright colors.

Tip #9: Use Symbolism in Your Low Key Photos

In photography, symbolism is a mode of expression designed to express your emotions, convey messages, and translate your feelings.

In order to express yourself photographically, you must learn to speak the photographic language. You must use a system of signs specific to the photo to visually translate your feelings, such as shapes, perspective, and curves.

Low key photography is a way for you to shape the photographic language. If I had to simplify my point, I would say that it is photographic grammar. The low key gives you a structure to set up your photographic elements in order to better express yourself visually. Just how grammar outlines a sentence by defining boundaries in a story, so does the use of low key in photography.

Let me take a concrete example to illustrate the use of symbolism in low key.

An Example of Symbolism in Low Key Photography

The photo below was taken at the headwaters of the Blue Nile in Ethiopia. It is part of my collection of art photos "time passing in black and white".

A low-key photo of the Blue Nile in Ethiopia. Photograph by Amar Guillen, photographer artist.

I am obsessed with the passage of time. On the one hand, I always wonder why all of humanity's past actions are useless since wars continue to exist; the poor are always present; many human beings only think of doing evil. You will think I am an idealist: you are right. I have been for quite some time.

On the other hand, I am passionate about the unknown future. I hope to make my dreams come true, to discover new landscapes, to observe animals I did not know existed. Within the future lies the realization of all my projects.

The passing of time is a recurring theme in my art photo collections.

For this photo of the Blue Nile waterfall, I chose as photographic elements:

  • The waterfall.
  • The small pond into which it flows.
  • The cliffs bordering the waterfall.
  • A promontory in the foreground.
  • A small waterfall on the left.
  • An overhead sky filled with clouds.

I wanted to add that I took more than 50 pictures before I found the right framing and composition for this scene.

For the elements of the photographic language, I chose a slight perspective that focuses one’s attention to the left of the photo. I chose a slightly off-center point of view to provoke this perspective.

I also chose a slightly raised point to have multiplanes above the waterfall to have the horizon. Now I just have to write the story.

By choosing a point of view on the promontory, I place myself as a spectator. I am an observer. I do not intervene, hence the foreground. The low key with a strong light on the waterfall allows me to direct the viewer's gaze to it, like a spotlight on a theatrical stage.

The waterfall never seems to stop. It is the passage of time. That is the message I wanted to get across to my audience.

The small pool of water symbolizes humanity. It records the experiences, the decisions, and the impact of human beings.

On the left, the small waterfall symbolizes what we retain from our experiences. This is what remains of all the knowledge acquired and symbolized by the main water flow. The two cliffs on the left and on the right of the waterfall allow us to channel our gaze. Symbolically, they mean nothing. They are simply present for the low key effect.

The presence of the sky and the multi-plane is essential for me. It helps to create hope. I want to believe that nothing is ever truly lost. I am an eternal optimist. I always believe that men are good. I think that everything is possible to make people happy. The clouds symbolize the fact that it is not easy. They represent obstacles one must overcome.

I hope that this example of the construction of a low key photo in a symbolic way will allow you to understand the power of photographic grammar associated with a clear photographic language.

My art photos are always built on strong foundations.

Why and How to Photograph Landscapes in Low-Key Mode

  1. Why and How: Photographing the Dragon’s Tongue of Black Canyon
  2. Low Key Photography: A Creative Photographic Technique to Make Your Photos Unique
  3. 9 Tips to Master Low Key Photography
  4. Photographing the Landscapes of Island in the Sky in the Canyonlands of Utah

Page 32 of 201

  • 27
  • 28
  • 29
  • 30
  • 31
  • 32
  • 33
  • 34
  • 35
  • 36
  1. You are here:  
  2. Home
  3. Blog Photographic Approach

Share on Social Media

Post
Share
Share
E-mail
WhatsApp
Text

Join Me on Social Networks

Join Me on Facebook  Join Me on Instagram  Join Me on LinkedIn

Claim your free guide to make your photo impactful and meaningful

Claim Your Free Guide '50 Pages of Tips to Give Impact and Meaning to Your Photos'.

4 + 8 =

Click Here To Discover All My Chronicles About the Photographic Approach.

Treat Yourself to a Fine Art Print That Matches your Personality

Example of a vacation home interior with a black and white fine photo art displayed on the wall.

Fine Art Print Collections in Black and White

Fine Art Print Collections in Black and White Black and white photography is a suitable technique for many nature scenes. It requires a particular frame of mind. A black and white photograph should be prepared and planned from the framing to the…
11991
Fine Art Print Collections in Black and White
An abstract art photo displayed in a contemporary living room decor.

Fine Art Print Collections in Color

Collections of Fine Art Prints in Color Color photographs allow digressions and take the audience to the message by secondary ways. The world around us, especially nature, is colorful. A color image can show the way our surroundings really are. Of course, it…
10440
Fine Art Print Collections in Color
Example of a home interior with fine art prints in my style back to black displayed on the wall. These photos are a part of my collection 'Wild beauties of Kenya'.

Fine Art Print Collections in Back to Black

Fine Art Print Collections in Back to Black I want to share my fine art prints of nature in a personal style that I call "back to black." "Back to Black" was developed to embody a sharp and clean style for artistic photos that can be hung in your living room,…
9980
Fine Art Print Collections in Back to Black
A waiting room with a photo in the style Fusion displayed on the wall. Grey Heron in Fusion.

Fine Art Print Collections with the Fusion Style

Fine Art Print Collections with the Fusion Style I would like to share a very creative and modern photography style to represent Nature in a very different way. I call it "Fusion." I created the style to offer dynamic photos, allowing you to start a good day…
7908
Fine Art Print Collections with the Fusion Style
A living room with a photo in the style 'Impression' exposed on the wall. Rising sun in impression

Fine Art Print Collections with the ‘Impression’ Style

Fine Art Print Collections with the ‘Impression’ Style The objective of this photographic style is to create the ephemeral blurs. That's why I named it 'Impression.' Photography, as an art form, is a powerful means of expressing reality from different…
5827
Fine Art Print Collections with the ‘Impression’ Style
Fine art prints from the style back to black displayed on a wall. Amar Guillen, photographer artist

New Collections of Fine Art Prints Dedicated to the Wonders of Nature

New and Updated Fine Art Print Collections Dedicated to the Wonders of Nature Fine art prints from the style back to black displayed on a wall.
11446
New Collections of Fine Art Prints Dedicated to the Wonders of Nature

Themes of the Blog Articles

Landscape of Arches National Park in Utah in black and white.

Blog Articles Dedicated to Artist Statement

Blog Articles Dedicated to Artist Statement
Dunes of death Valley in Black and White

Blog Articles Dedicated to Black and White Photography

Blog Articles Dedicated to Black and White Photography
Abstract photo or trees reflection on water

Blog Articles Dedicated to Photographic Mindset

Blog Articles Dedicated to Photographic Mindset
Abstract photo of ridles on water

Blog Articles Dedicated to Artistic Photography

Blog Articles Dedicated to Artistic Photography
Abstract photo of Yellowstone

Blog Articles Dedicated to Photographic Language

Blog Articles Dedicated to Photographic Language
Pronghorn in Yellowstone

Blog Articles Dedicated to Wildlife Photography

Blog Articles Dedicated to Wildlife Photography
Landscape of Bryce Canyon

Blog Articles Dedicated to Photographing United States

Blog Articles Dedicated to Photographing United States
Underwater waves in the Red Sea

Blog Articles Dedicated to Photographic Techniques

Blog Articles Dedicated to Photographic Techniques
Tree of Black Canyon in Black and White

Blog Articles Dedicated to Landscape Photography

Blog Articles Dedicated to Landscape Photography
Manta Ray in Maldives in Black and White

Blog Articles Dedicated to Underwater Photography

Blog Articles Dedicated to Underwater Photography
Red Deer stag during the rut of the deer

Blog Articles Dedicated to Photographic Judgement

Blog Articles Dedicated to Photographic Judgement
Great Crested Greb and his chick

Unclassified Blog Articles

Unclassified Blog Articles

You Might Be Interested By One of These Photographic Approach Articles

Photograph in black and white of the Grand Canyon from Arizona State in USA.

Why and How Mastering the Steps of Creating an Art Photograph

3603
Why and How Mastering the Steps of Creating an Art Photograph
An example of a narrative photo. Landscape of Island in the Sky in the Canyonlands in Utah in United States. Photo in black and white by Amar Guillen.

Why and How: Creating Impactful Narrative Photos

4118
Why and How: Creating Impactful Narrative Photos
Snowy landscape of Yellowstone during winter.

3 Steps for Giving Meaning to Your Photos

8750
3 Steps for Giving Meaning to Your Photos
Two lions in Kenya. Photographed in black and white. Photograph by Amar Guillen, photographer artist.

To Create Aesthetics Photos, Print your Images

4238
To Create Aesthetics Photos, Print your Images

Receive Free Tips On How to Give Impact and Meaning to Your Photos. Subscribe to Receive Regular Articles.

2 + 7 =

Contact Me By Email

10 + 9 =
This site is protected by reCAPTCHA and the Google Privacy Policy and Terms of Service apply.

About Amar Guillen, Creator of Fine Art Prints of Nature
As a photographer capturing the artistic essence for several decades, I have mastered the art of crafting an authentic experience for art enthusiasts and collectors of visual art.
When I observe my surroundings, be it friends, family, relationships, or professional contacts, I see souls in perpetual motion. Every moment of their existence is engulfed by daily hassles, work concerns, social media, online or televised information streams, and videos on the web.
Every minute, they strive to accomplish something, fearing losing ground and feeling marginalized in this frenzied society. Imprisoned by an oppressive schedule, the essential eludes them, drowned in the tumult of daily life. Is it really crucial to watch yet another cat video on the internet? Is it necessary to post twenty daily messages on social media?
Despite this, they remain constantly stressed and anxious about the challenges of the world, without being able to influence these monumental problems. It is at this moment that my artistic nature photographs come into play. Those who have had the privilege of hanging one of my works in their personal or professional space have expressed a radical transformation in their lives.
Every day, contemplating these works of art immerses them in tranquility, inner peace, and rediscovered serenity. They then understand that nature has the power to unravel tensions, to encourage reflection on the essential. Artistic photographs thus become open windows to the wonders of nature.
I have chosen to share the best of myself by helping others discover their identity, personality, style, all while reconnecting with nature. Take the time to explore my artistic photographs if you wish to reveal your true essence. Once hung in your space, your view of the world will be transformed.
Amar Guillen is a creator of fine art prints of nature.
I am Amar Guillen, creator of nature art photographs. I have a deep conviction that contemplating nature has the power to transform human beings. If everyone learned to know, respect, and preserve nature, our world would be transformed into a haven of peace where everyone would find their place.
Copyright © 2003 - 2026 Guillen Photo LLC - All rights reserved. Amar Guillen, professional photographer since 2003.
  • Blog
  • Calibration
  • Legal Information
  • Sitemap
  • Accessibility
  • Contact Me
  • Updates of the Website
I Want to Help You to Create Interesting Photos

How Can I Help You To Create More Interesting Photos?

Ask Me a Technical Question.
Subscribe to my Newsletter. The Inspiration Behind Guillen Photo.

Select your language

  • English (United Kingdom)
  • Français (France)
Claim your free guide to make your photo impactful and meaningful

Claim Your Free Guide '50 Pages of Tips to Give Impact and Meaning to Your Photos'.

4 + 5 =

Contact Me By Email

4 + 9 =

Office Address:
3512 Robin Road
Plano Texas 75075
USA

Office phone: (+1)214-769-6825